Amazingly Delicious Petit Fours Recipe
Petit Fours:
- one 9″ X 13″ vanilla cake
- 2 c. (one can) vanilla frosting
- various liqueurs (kahlua, limoncello, vanilla vodka, frangelico, etc.) or flavored simple syrups
- various fillings (lemon curd, jam, nutella, cream cheese mixed with sugar, etc.)
Petit Four Poured Fondant:
- about 7-8 cups powdered sugar
- about 3/4 – 1 c. hot water
- 1 c. vegetable shortening (crisco)
- 1/4 tsp. salt
- 1 tsp. almond or clear vanilla extract
- food coloring (optional)
Directions:
1. Bake your cake. I just used a regular boxed white cake mix, in a 9″X13″ baking pan lined with nonstick foil (for easy removal). You can use your favorite white cake or pound cake recipe – or just use boxed cake mix like I did here to make it easier.
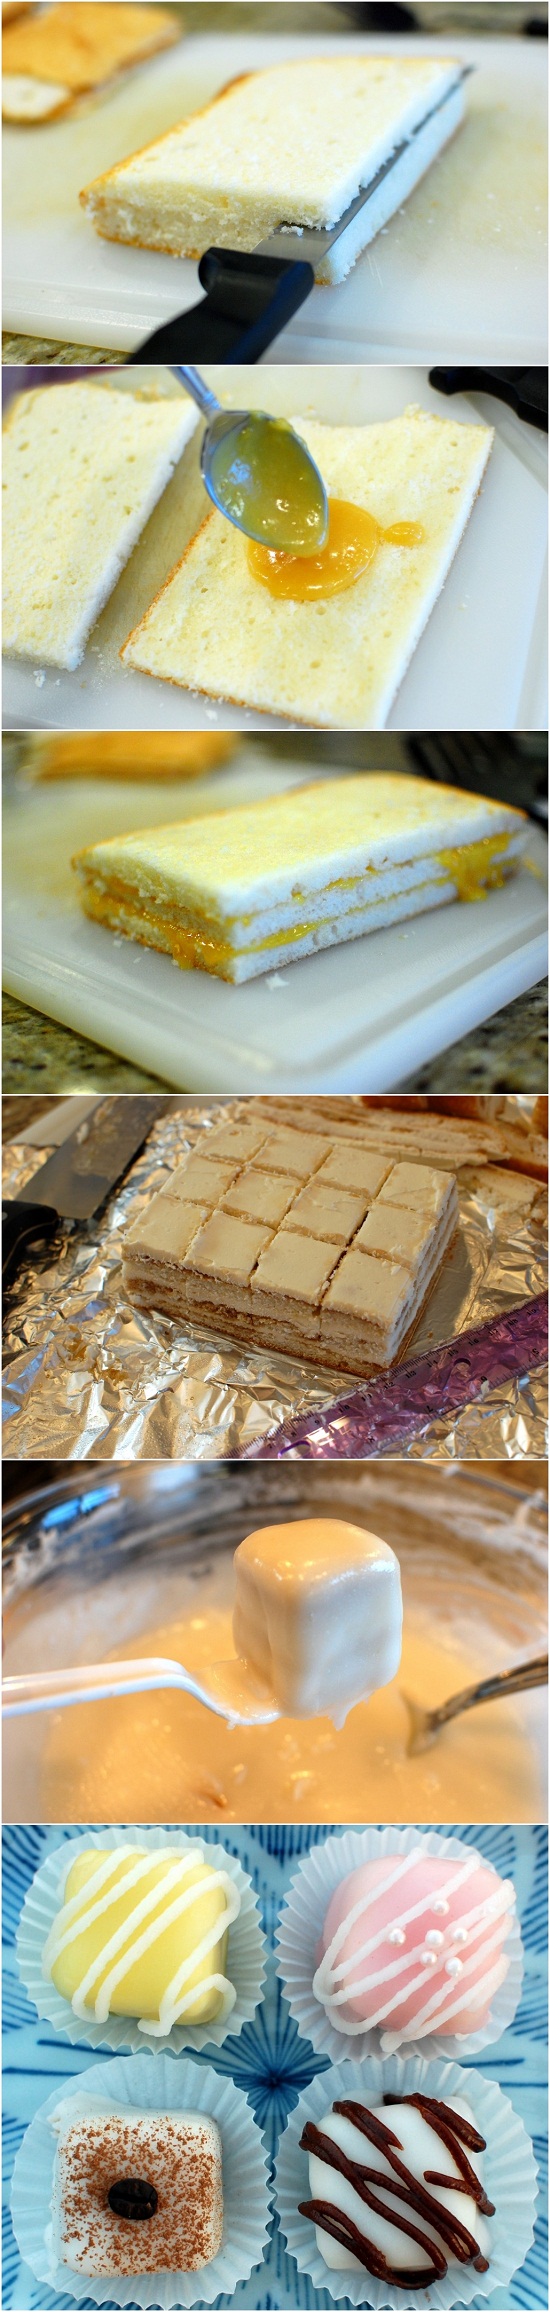
2. Allow your cake to cool. Using a cake leveler, slice off a very thin layer of cake off the top. If you have a steady hand, you can do this freehand – but I don’t – so I used my Wilton Cake Leveler.
3. Cut the cake in half vertically and horizontally – so that you end up with 4 smaller 4.5″X 6.5″ rectangular cakes. (I used each quarter to make a different flavor.) Take one of the cake quarters and using a serrated bread knife, carefully slice the cake horizontally into 3 very thin layers. (When the cakes are smaller like this, it’s easier to freehand the cake layers.)
4. You should now have 3 thin sections of cake. (You will reassemble them in just a moment.) Place the bottom layer on top of a piece of non-stick foil, and using a pastry brush – tap on about 1-2 T. worth of liqueur (limoncello in this photo). (Yes, I know the first layer of cake is not on foil in this photo – that was my mistake this time! It worked out much better for the next few flavors when I started on the foil so that I didn’t have to move the soaked cake to the foil afterwards.)
5. Spread a few tablespoons of filling over your first layer (I used lemon curd).
6. Top with the second layer and repeat. Place the final layer on top, and soak that with a little bit of liqueur also.
7. Frost the top of the cake with a thin layer of vanilla frosting, then wrap in foil and freeze overnight. (Make sure you don’t skip this step! You want the cake to be frozen so that it is easier to cut and holds together when your pour the fondant over it.) Repeat with the remaining 3 sections of cake – feel free to use other flavors and mix it up if you like.
8. The next day, take one section of cake out of the freezer, and using a clean ruler as a guide, mark off a one-inch grid pattern. Cut off the sides, then cut out the grid so that you end up with 12 one-inch squares with smooth/straight edges. Set aside the cake scraps for a snack, then re-wrap the cake squares in foil and put back in the freezer for at least another 30 minutes. Repeat with the remaining cake sections.
9. To make the poured fondant, melt the shortening in the microwave.
10. Add about 5 cups of powdered sugar, and stir to make a paste.
11. Carefully add about half of the hot water, and stir until it is almost uniform (you will have a few lumps).
12. Put the bowl back into the microwave for another 30 seconds, then add more hot water and sugar until you have a pourable consistency. (Microwave to loosen it up for a few seconds when needed.) Use a whisk to break up all the lumps and get the fondant very smooth. Add the salt and flavoring.
13. To dip your petit fours, use a dipping fork (or my “free” dipping fork – a plastic fork with the inner tines broken off). Remove one of the foil packets containing cake squares from the freezer. Place one frozen square on the fork, then hold over the bowl of fondant.
14. Use a large spoon to scoop fondant over the square – several times – making sure you coat all sides. Let the excess fondant drain off. (You will get a few crumbs in the fondant – but most will slide right off and will not show up in your final product.) Microwave for 15 seconds every so often to loosen up the fondant if it gets too thick, and whisk often. If you want to tint your fondant for a section of cake, put some of the fondant into a glass Pyrex measuring cup and stir in 1 drop of food coloring. You may have to microwave for a few seconds more often, as the smaller quantity will get thick faster.
15. Use a skewer to push the petit four off the dipping fork onto a wire rack to set. Let your Petit Fours rest on a rack (oil the rack with a little bit of vegetable oil to prevent sticking) until the coating has solidified.
16. Once your petit fours are all coated, and the fondant is set – you can decorate. You can pipe all sorts of patterns on the petit fours – but the easiest (but also elegant looking) design is just a simple drizzle in a contrasting color. I used the leftover white fondant as a drizzle over the colored petit fours (Microwave the leftover white fondant in a Ziploc bag for a few seconds and snip off a tiny bit of the plastic bag corner, then use the bag to drizzle over the surface of the Petit Fours). To make the chocolate drizzle, I just added a few teaspoons of unsweetened cocoa powder to the leftover white fondant – then put that into a Ziploc bag to use as a drizzle over the white petit fours. For the tiramisu flavored petit fours, I dusted a little bit of cocoa powder over the top and added a coffee bean. Be creative!
17. Place your petit fours into small paper cupcake liners for a more elegant presentation. Store in the refrigerator for up to 2-3 days.


1 thought on “Amazingly Delicious Petit Fours Recipe”